This project was inspired by a lot of the fpv flying I have done recently. I wanted to create something that tried to convey fun playful energetic feel of flying in the air.
I used Cinema 4D as my main tool for creating this project starting with the drone model which was based from my personal favorite one(that currently isn’t working of course).
In addition to modeling the drone I also went the extra step to make the propellers actually spin the way the would in real life. This was just a side personal exercise I wanted to try to see if I could do it via expresso inside of C4D. It took me a while and doesn’t show up in the animation since everything is moving too fast but I posted how it works on my instagram.
The city was a free download from 3docean that was the initial jump off for this project. After building my model I then figured out how to procedurally create the city using mograph in c4d. Allowing me to randomly place and distribute the city buildings. I didn’t use all of them in the pack but the most of the taller ones and few shorts ones. I added in some small parks to break it up a bit and to have some low flying action.
I wanted the whole project to be a bit more stylized and not super realistic so I went with the sort of low poly style which I think worked well and adds a fun feel to it. Also low poly is slightly easier to work with though the end it took decent amount of time to get it feel right.
After getting the look down I proceed to make the path that I wanted to fly the quad. My process for this to start in park and just places instances of the quad though out the city of the path I wanted it to take, pretty much blocking the path out as I came across the next building. Most of the moves are I’ve seen various popular fpv/drone youtubers do.
After laying out the path, I actually typed up an outline of the path so I could remember what moves I actually wanted to do, while labeling them in c4d as well. Then I made a spline path in c4d for the quad to follow.
My first path of animating it was attaching the quad to the spline but it felt too much on rails(which is was, the spline). So I ended up animating the whole thing by hand. I think the end result turned out pretty good though I still notice a few unintended extra moves I could have smoothed out. Some I left in since it seemed a bit more realistic or how I would try to recover from a move.
Before rendering it out I had the idea to add in some 2D effects to spice it up a bit. I have some 2D flash effects and thought I would composite them into the project in post in After Effects. But I didn’t want to have to export extra 3D data or do a lot of masking in AE.
So I rendered out png sequences of the effects and placed them in c4d on planes and other simple shapes and timed them with the quads moves. It came out pretty though I had to remember to turn the effects off after the animating other wise it would show up as black over other parts even if it had alpha at the end.
The final render time was probably around 15 hours between my two machines not included some re-renders of a few shots I messed up on. Also had to fix one shot that I messed up an an effect that a friend noticed.
After doing a bit of compositing in After effects I rendered out the 6 camera shots and the main First person view from the drones perspective and edited it all together in Adobe Primer Pro and added the final look. I did the final sound design in Audition. Overall it took me about 40 – 60 hours to complete over a 2 weeks though most of it was completed in the final week.
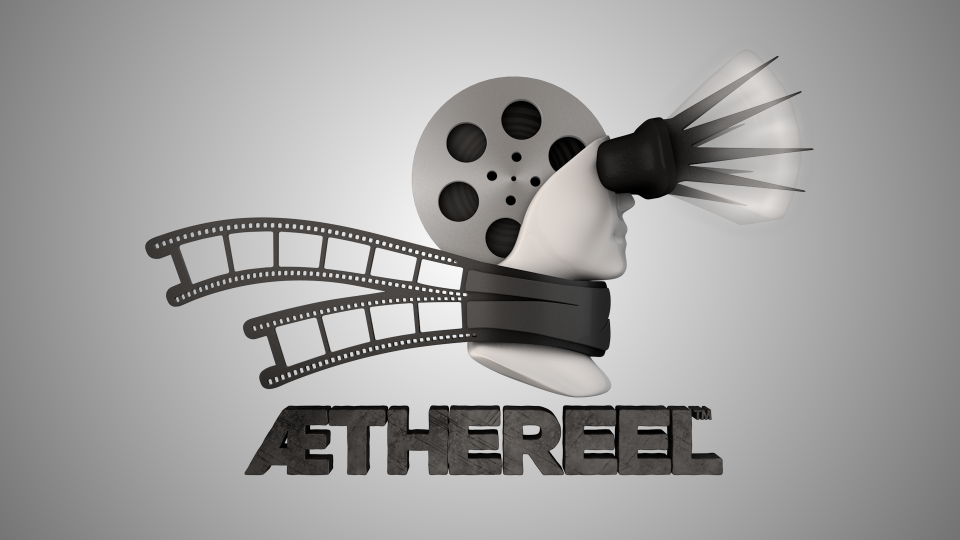
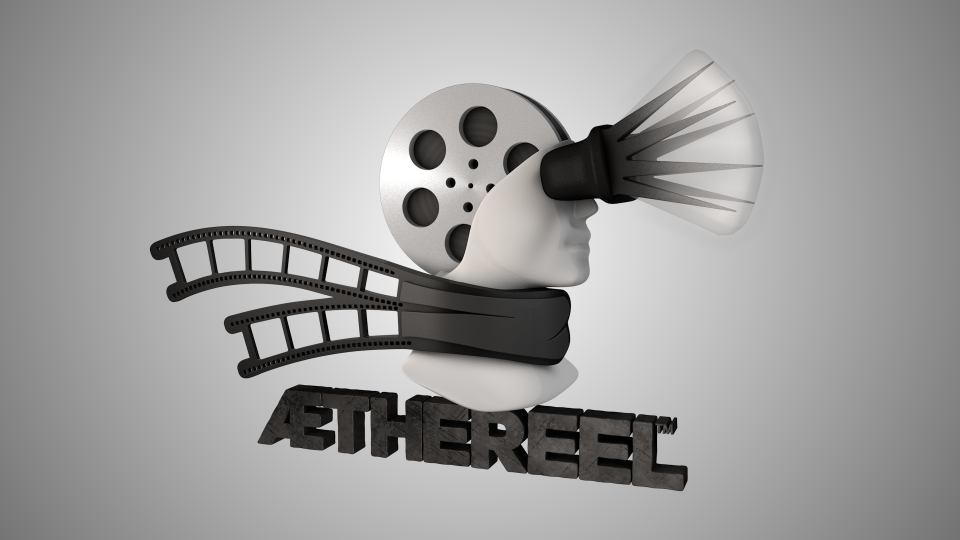
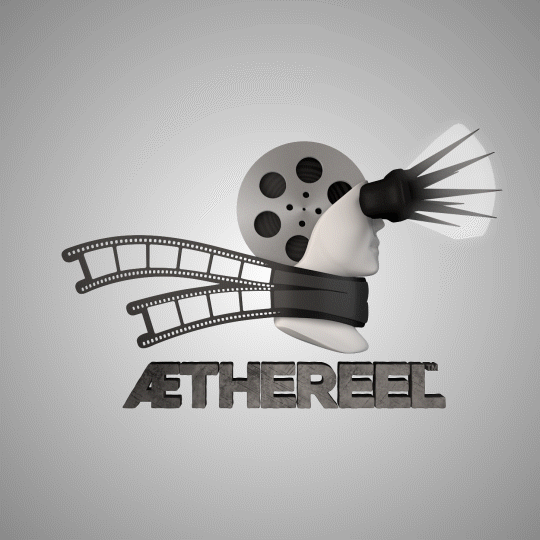
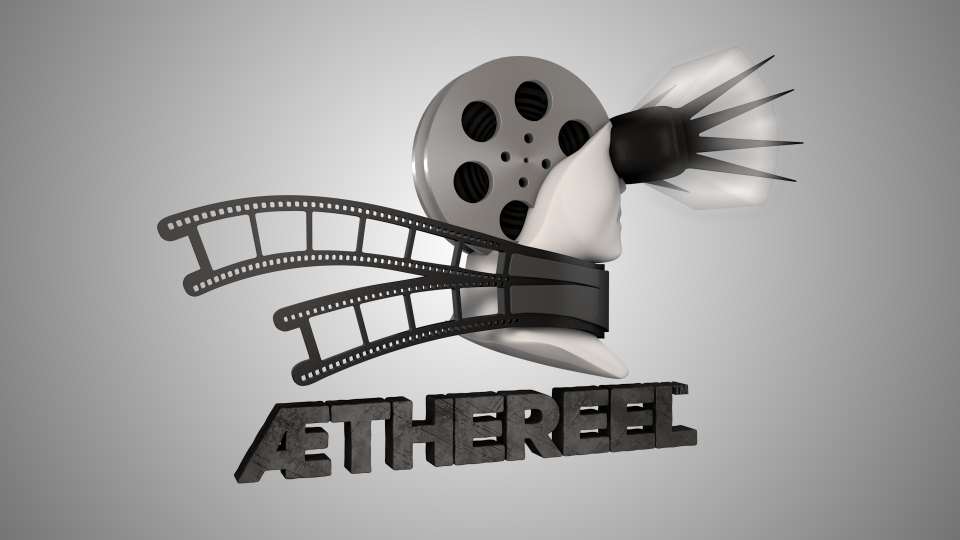
About 4 months I was contacted through Envato Studio, formerly microlancer, to do another 3D Logo Design. This will be the third job that I have received through their service and unlike my earlier jobs this one was a bit more of a custom job.
The client wanted the 3D version of their logo to be a bit more than just a flat extrusion of their vector file. So I actually modeled a 3D head for logo instead of just extruding out the shape of it. Everything in the logo is model as a full 3D object except the text and the “reel” scarf.
That was an extrusion so that it matched up more with the illustrated logo. The idea for this logo later was that it might transition from the 3D version to the 2D version and would need to match up pretty closely to make it as seamless as possible. I also had another version where scarf was mirrored on both sides, which looked “cooler” in my opinion, but wouldn’t work for its final purpose.
After a few revisions I was able to end up with a version of the logo that client like that fulfilled all of their request.
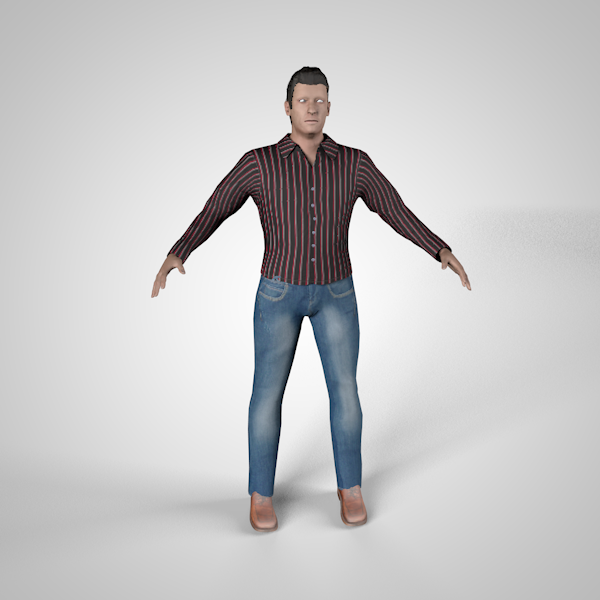
This project began as a request from my producer at work Brain, it was if we (the graphic artists) could model and 3D print a figure of one of our talent for an awards show he was producing. This model would have to resemble the main talent of the show and look like an actual gold trophy. I was one of the three artists working on the project.
We began by brainstorming ways to capture the talent that could be easily translated into a 3D model for printing. My first thought was to use a program by Autodesk called 123D Catch to get the best representation of our talent for our model. Unfortunately we did not have direct access of our talent, and although we where able to get pictures of the talent from various angles of the chest and head it was not enough for the application to process and create a model for us.
I also looked into some alternatives that would work like the Autodesk application but with less proprietary restrictions. I found a good blog post on ditching 123D Catch however the application, insight3d, seems to work better for interiors and exteriors then people. Another alternative was FaceGen which was mentioned and used in a CorridorDigital video, but the cost for this application was not in the budget.
What we did use, as suggested by my awesome co-worker Caresse, was Makehuman. This open source application lets you easily create realistic characters. Age, weight, eyes, nose, body proportions, and more can all be easily adjusted using sliders. Caresse worked with the producer Brian to get the model as close as possible to our talent. This took a bit of back and forth to get his likeness into the model and even after we were done using the application we still had to do some manual tweaking of the model to get it to look just a bit closer to our talent.
The next step was to pose the model for the final 3D printing. Fortunately MakeHuman exports the model with a full skeletal system that is already skinned to the character. I was able to add IK(Inverse Kinematics) to the arms that allowed me to easily pose the model’s arms. I had IK on the legs as well but I took them off since the pose for the legs was simple and did not required them to be bent. Having IK on the arms turned out to work well since the original pose was to have the arms crossed, but since it looked awkward we opted to have the arms out one holding a stopwatch and the other holding a clipboard.
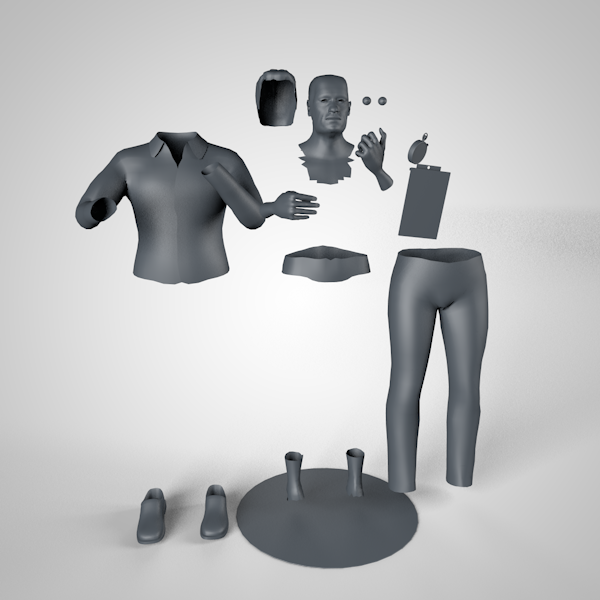
After locking down the pose, we proceeded to prep the actual model for printing. This required us to connect all the parts of the model together to make it one whole piece. This was probably the most tedious part of the whole process. The head/neck, shirt, arms, pants, ankles and shins, and shoes all needed to be connected to each other to make one piece for printing.
Next after combining all the parts was we added a base and optimized the stopwatch and clip board for printing. The model however would still need some more tweaking once we tried to get it printed. We also tried to use the sculpting tools in Cinema 4D to add some extra detail in the model. They looked great but when prepping the model those parts did not hold up well in the printing system checks so we removed those details.
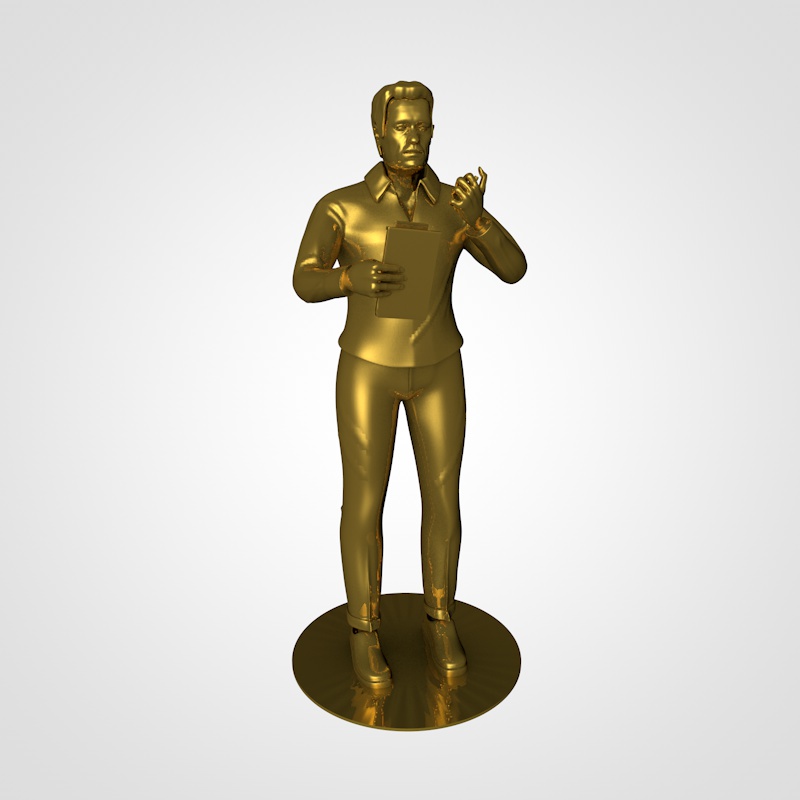
At this point we had a good model that we could do a quick rendering of to show what we had been working on for the past couple weeks. We also were ready to start uploading it and seeing what we would get back as far as printing quality and integrity. My first thought was to use Shapeways since they have printing for 6 days if the model print size is under 200mm(20cm/7.87”). Although our originally goal was for print size to be between 9”(22.86cm)-12”(30.48cm) high figure, my producer said that the size limit would be fine if it would come in on time. However the estimated ETA for arrival was longer then expected so we could not use them.
I started to look for alternatives that would allow us to make our deadline. I found a number of sites online and most where priced around the same as Shapeways. The top two that I found that where the closest was i.materialise.com and sculpteo.com. Both had pricing similar to Shapeways for the size we wanted to print, but Sculpteo had more tools for fixing and reviewing our model using their system that made it the front runner of the two.
Between the two of them I uploaded over 40 different model versions tweaking the geometry to attempt to fix any issues that may arise during the printing process. I had an especially hard time with the thickness of many parts of the model that did not meet the minimum required thickness. The collar and thin parts on the stopwatch and clipboard where always giving me issues. Luckily with the print being rather larger most of the small parts would be larger enough just because of the print size otherwise I would had to figure out some other solution.
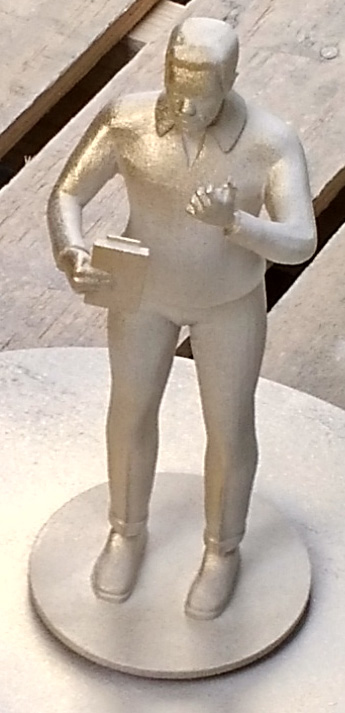
While working with these online solutions I was also still searching for a local printer in NYC to use as well since I thought that would be a good option and being local would help with delivery time. I was able to find a 3D printing place local to NYC and we were able to get in contact with them to discuss the project and had them print out an 8” figure of our model. There was one caveat though, and that was they did not have their ABS printer working at the time so we had to use their Sandstone 3D Printer. Which is not the worse option and has the ability to print in color, but is more fragile then ABS or PLA plastic material.
We went with this local printer for the company model, however as a back up I had two other models commissioned for printing via the website 3dhubs.com. This site lets you connect with 3D printer owners directly to have them print your 3D model for a fee. You can easily upload your model have it system checked for printing and priced out. Then you can search for a printer locally and either pick it up or have it shipped to you. An awesome idea that is just starting out but seems like it will have future with the growth of 3D printers.
I choose three printers local to New York City and sent them a preliminary request about my deadline and a preview image of my print. I received responses from two and choose to have a print made with both of them. One of them unfortunately had an issue with their printer, so mid print their printer broke down with some technical problems so I could not get a print from them. I did however get a clean print from my other hub, which was Peerless’s Hub. If you want read my experience working with this hub check out my review on his hub, but to sum it up I had a great experience working with them. I also used a different material for the print as well, using Makerjuice G+, which I had never used before but is similar to PLA.
Now began the waiting process as the prints where completed. This was one of the more nerve racking parts during the project since it was all in the hands of the printers and we had to trust that they would produce our model in the time we needed it. I was kept update with my prints fairly regularly from the 3D hubs printer and knew of any issues that cam up during the printing process. From the NYC local printer not so much but both arrived in time for when we needed them to.
Through out the whole process we had been discussing at the same time how we would would actually paint our model to make it resemble an actual gold trophy. I did a lot of research on how to paint on 3D printed plastic as well as other figures. I also did some searching on what would be the best type of gold spray paint to use to get the best looking gold items as well. The video links were especially good to actually see how the paint looked when applied to an objects. They also helped me determine the final paint that I would get which was Rust-Oleum 1910830 Metallic Spray Gold & Rust-Oleum 7710830 Bright Coat Metallic Color Spray Gold both 11-Ounces. The first one I used on the backup and the second on the sandstone model.
All of this researching was good but it didn’t nearly help as much as asking someone who had years of experience actually doing production work. This is when I asked around the graphic artists at work if they knew about spray painting. Neil, who is a newer addition to our group at work, had years of experience working in production and graciously lent his expertise to our project. Using him as a resource I was able to determine not only some more material I would need to buy but also some techniques for painting. He pretty much did most of the priming, painting, and lacquering of the company model that was eventually used in the show.
The process was for making the models look like gold was fairly straight forward. On my backup model I did not use the primer and simply applied the gold paint directly to the model doing 2.5 coats. I would have done a full 3 but I ran out of paint due to my earlier tests I did. These test lead me to believe that I could paint directly on the model without primer.
That was not the case with the work version that was sandstone. After testing it we decided that the sandstone was to porous and would required a few coats primer before applying the gold. We also where concerned that to much of the grain from the sandstone would show through the paint. It does show as you can see but it does add a nice feel to it that wound up looking nice for our purposes. I still like my version of the model a bit better since it has the nice clean shiny look of an actual trophy.
The last step we had to do was to apply the models to our base which was a plastic mirror riser that I found on amazon. We went through a few options to find one that we thought work well since we decided not to go the traditional route with a wood or marble-esqe base that is normally used. We applied it to the base using some 5min epoxy that I brought from home.
The next day they used the model on the show and even did a close up on it which made me cringe just a bit. Overall though it worked well as a prop on the set and looked pretty official looking despite being built in just few weeks. I wasn’t scheduled to work when the show was recorded by my producer was kind enough to give me a DVD copy of the show. We also did some other graphics that feature the trophy throughout the show as well.
My last thoughts about the whole process are about how cool it was to do a different type of project then what we normally work on. It was quite an experience working on making physical object as it did the previous times I have. It definitely makes you think about your modeling process differently especially in regards to how scale is so important. And as always I wish we had more time, particularly working on the design of the model. We got a few comments on his pants legs, looking like high waters a bit, and on the shape of his hips. Both could be fixed if we had the time to review the model a bit longer before trying to get it printed but we had to make our deadline.
It was a great project to work on and I’m glad we got the chance to work on is despite the concerns of our manager saying the project would take too much extra time(which it did) to complete it.
Lessons Learned
Take more time making your model as good as you can before print prepping
Be prepared to do some more iterative tweaks to get your model ready for printing
Research your 3D printer thoroughly and choose wisely, especially if you have a deadline to make
Have a solid location for the painting process and letting it dry in a ventilated area.
As I’m always looking for more ways to do the type of work I like to do I try to keep up with new things that will enable to continue doing the type of work I like and get paid. Envato has many different services to do this and the recently release a new one microlancer.
I recently completed my first project and second one soon after using this service. I have one service listed for 3D Logo Design.
I have used services like microlancer before though I have rarely received jobs though them, rather most of my jobs have been found working directly with people on various projects. I had a great experience using their service despite not complete sure how the actual system worked until I had a client. The two jobs I completed where from the same person who needed a logo converted from a 2D design to 3D. They client liked the result on both logo customization’s and I was able to complete the job on time.
So if you need a very quick no-nonsense 3D logo from a logo you already have check me out on microlancer. Or you can always contact me directly for any project you might have in mind.
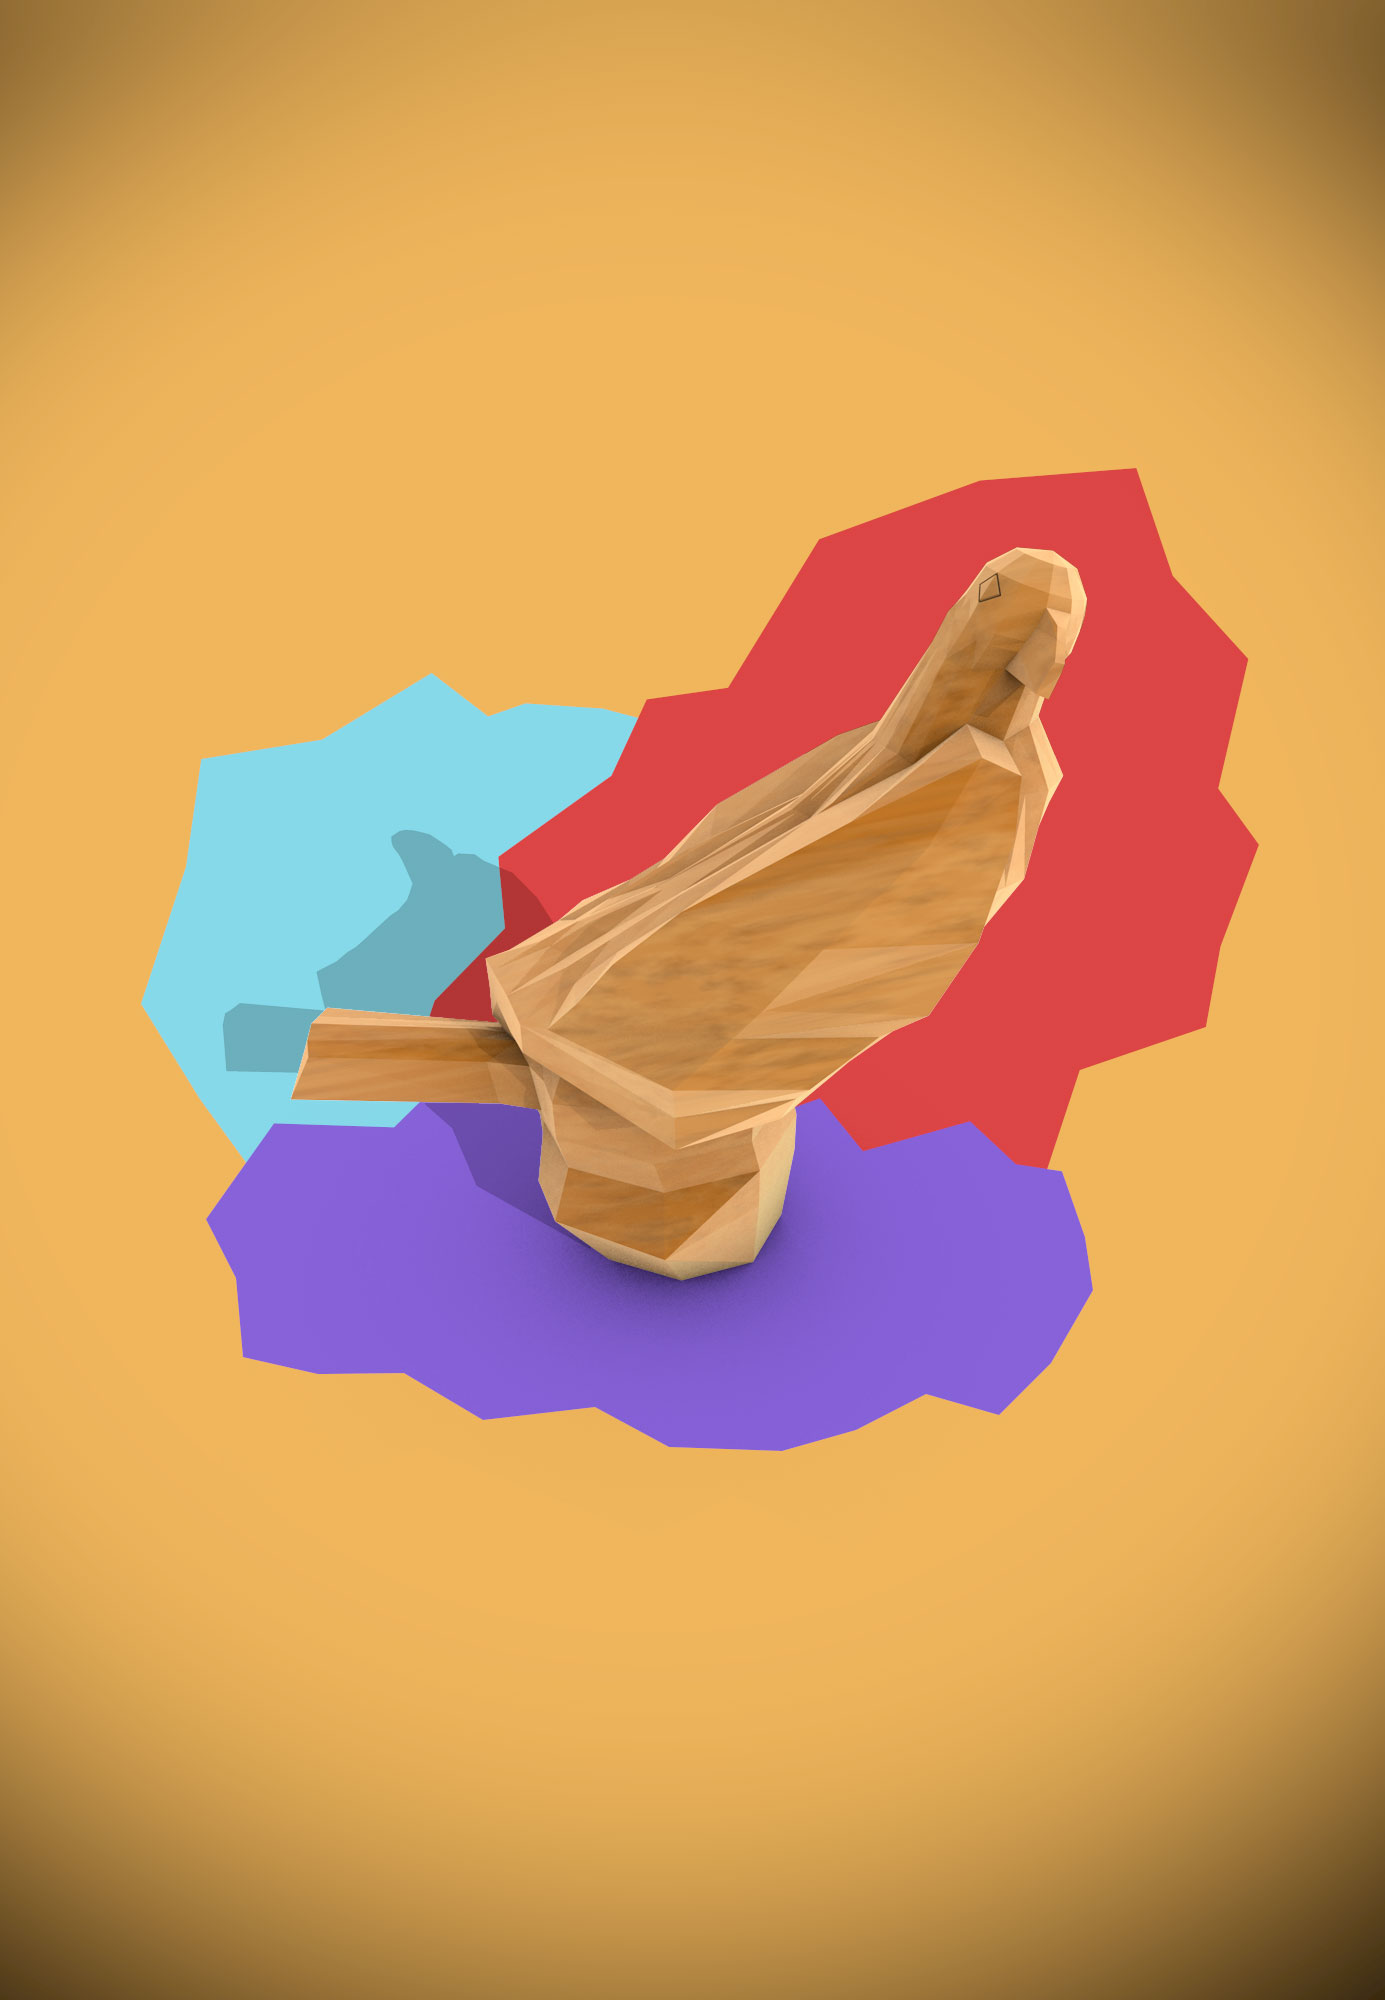
After following this quick low poly tut on cgtuts I was inspired to do my own little low poly model. The best thing out of this tut for me though was the tips and shortcuts the author give for modeling in C4D. I used some of his tips and when ahead and modeled this bird statue in my house. It looked too plain by itself so I added a quick design behind it as well.
One of the areas I feel that I’m not as strong at in 3D sometimes are my rendering skills and the specific skills that help with it like understanding scene scale and lighting. I’ve also have tried out various tools to help me speed up this process. I have used Vray for 3DS max at work for a bit now and it greatly enhance the renders without much effort (at least for the type of work I do). At home however I don’t have max or vray and getting just a trial for vray for c4d is not a seemingly easy thing to do. So looking around I came across Maxwell render (now owned by Nextlimit, Realflow) again and this time I decided to give it a serious try.
Just going through the tutorials I was impressed with the real looking renders you get without much effort so I decided to get the learning edition which is only $99 with a few limit like render size but no watermarks. The above render is a character I modeled and rigged from a logo I found on brands of the world.
moskarachos
I’m still not sure what the word means that the image was titled with even after trying to look up the word, hopefully nothing bad. I had two ideas for how I wanted to render the scene either glossyish plastic like a toy or flat shaded to seem like the logo vector. I decided just to go with the flat shade for now but it still has very nice lighting overall. I think I may work on a static image of a plastic version for a still shot.
I’m pretty happy with how it turned out and learning how to use Maxwell Render. I did forget to turn one effect on in my scene for the final render which I’m kind of mad at myself for not doing but I’m not going to render it again now.
This past Friday I received a package from shapeways of my bison whistle. I was super excited when I found out earlier that week that it was shipped early than I expected.
After receiving them and getting over the initial awe of seeing something I made in the computer in real life (which lasted all of 1-2 minutes) I noticed many things about my developing modeling skills and understand a lot more about the translation from a 3D computer model to 3D real life object.
Scale matters…of course.
I have learned over time how relative scale work in regards to lightning object, dynamics to certain degree and even how fluid works with it in regards to real life size. Though making a real object took a bit of work and in the end I think I should have scaled my model up a bit more still.
I based my object on dimensions of a hair brush on my desk which seem a good size for the whistle. I did this in first center meters since that is one of the units of scale that shapeways takes, but for some reason I could not get my object scaled right even after adjusting the exports setting for stl or wrl. In the end I went with inches and the site took it perfectly. I’ll have to figure out what I did wrong eventually.
Full Color Sandstone vs. White Strong & Flexible Plastic
Both look awesome but plastic seemed to add even more smoothing to the model which is nice. I also notice less of the production process it took to make (though you can notice some stepping), where as on the sand stone I can feel and see where It also was heated, printed and is still smooth in some parts. However the sandstone one is fully hollow as I originally model it but the plastic is not. Not sure why though, maybe it was to hard to clean it out? The plastic also has some extra plastic on the horn tips as well.
My final thoughts is that 3D printing is awesome and I can’t see why people who really 3D modeling for a living shouldn’t get everything cool they model printed. It makes me want to become a better modeler just so I can print them out and see it in real life.
Also if any one else want this I put it up in my 3d printing shop for any one to buy.